The source of this article comes from
http://www.securityfocus.com/infocus/1559; edits where made to deal
with remote access vs. local access.Overview of IP Security
Policies
Windows 2000 IP Security filters are defined (see figure
1) in the "IP Security Policies on Local Machine" view located under the
"Computer Configuration Security Settings" in the Group Policy Editor
snap-in for the Microsoft Management Console (MMC) application.
Alternately, this snap-in can be launched directly by executing the
GPEDIT.MSC application from the START menu.
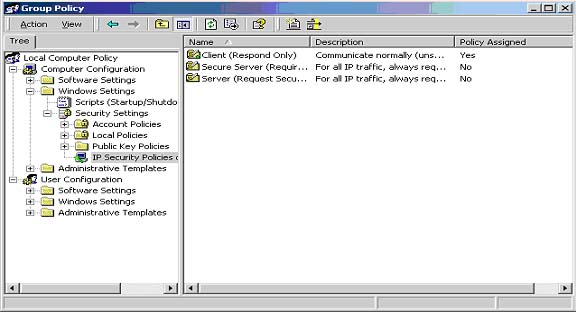
Figure 1: Snapshot of the default IP Security policies
Three IP Security policies are defined by default:
- Client (Respond Only)
- Require Security
- Request Security
Client (Respond Only)
This policy is typically used by workstations to respond
to authorization requests from Windows 2000 servers that require a secure
authentication before using a service.
Secure Server (Require Security)
This policy is used on Windows 2000 servers and Windows
2000 hosts that provide network-based services to ensure that
non-authorized or non-encrypted traffic is denied from communication. This
setting only works in a pure Windows 2000 environment.
Server (Request Security)
This policy is used on Windows 2000 services in the same
fashion as the Secure Server policy, except this policy attempts to
negotiate the highest level of authentication and encryption possible with
the client. This setting is useful in a mixed-mode environment. As stated
previously, the possibility exists to create custom policies for use on a
Windows 2000 installation.
Defining a Custom IP Security Policy
By right-clicking in the "Group Policy" policies window,
you will be presented with menus allowing the creation of a new IP
Security policy and the ability to manage IP filter lists and actions. In
this walkthrough, we will start by creating a basic filter action with a
BLOCK action, then will create a filter set that will allow Windows
Terminal Services from a specific set of IP addresses and deny it from any
other address.
Create the DENY Filter Action
By selecting the "Manage IP Filter Lists" and "Filter
Actions" from the right-click menu, you will be presented with the
interface to create new filters and filter actions (Fig 2).
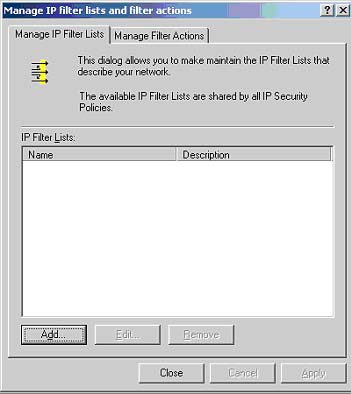
Fig 2: Manage IP Filter Lists and Filter Actions
Select the "Manage Filter Actions" tab and click the
"Add" button. Under the "Security Methods" tab, you will be presented with
three radio buttons (Fig 3): "Permit", "Block" and "Negotiate Security".
Since we are defining a "DENY" filter action, select the "BLOCK" radio
button. Now, define a name to this BLOCK operation so it can easily be
referred to in a filter. Select the "General" tab and enter "DENY" in the
Name field. Optionally, a description may be given to describe the intent
of this new filter action. Click "OK" when finished. You should now see
the new filter action named "DENY" in the "Filter Actions" window.
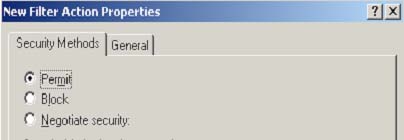
Fig 3: New Filter Action Properties
Create the Restrictive Filters
Click on the "Manage IP Filter Lists" tab and click the
"Add" button. You will now be presented with the "New IP Filter List"
window. Set the Name field to "Allow Terminal Services" with a brief
description of this filter. Ensure that the "Use Add Wizard" checkbox is
selected and click the "Add" button. You should now be presented with the
"Filter Properties Wizard". After clicking on the "Next" button, you
should be prompted to enter the IP Traffic Source address. Five different
choices are available for this:
- My IP Address - Specifies that the filter will use
the current IP address assigned to the system. This setting is
recommended on a host that contains a single network connection that
uses either DHCP or has a static IP address, and does not perform
routing functions. Using this setting is not recommended when multiple
network interfaces are installed and active on a host.
- Any IP Address - Specifies that any source IP address
will be evaluated.
- A Specific DNS Name - Specifies that the host is
defined by a DNS name. Since the IP Security filters utilize IP
addresses, this selection will perform a DNS lookup of the supplied
host-name and will insert the actual IP address into the filter rule
during the filter creation.
- A Specific IP Address - Specifies that a single IP
address is to be utilized.
- A Specific IP Subnet - Specifies that a network range
will be used by entering the IP subnet network and the associated
netmask.
Since we are defining a filter that will restrict
Terminal Services from a IP, select the "Specific IP" item. Enter the
network IP address in the boxes provided, and click the "Next" button. In
our examples, we will assume that our company's IP is 10.0.0.0.
Next, you will be presented with the "IP Traffic
Destination" dialog box. The options for the selection are the same as the
"IP Traffic Source" dialog box. Since we are creating a filter that will
restrict terminal services to this local server, select "My IP Address"
and click "Next".
Next, you will be prompted to select the protocol type
to be used in this filter. Many different protocols are defined. Since
Terminal Services utilizes TCP connectivity, select the "TCP" option and
click the "Next" button.
You will now need to select the port to be inspected in
this filter. Since Terminal Services utilizes port 3389, and we are
defining the rule to allow Terminal Services to the local machine, select
the "To This Port" radio button, enter "3389" in the text field, and click
the "Next" button. Click the "Finished" button when done.
The filter that was just created will allow Terminal
Services from the specified subnet to the local host; but since it is
simply a packet filter, a reverse rule must also be created. Microsoft
includes the Mirror Rule option, but it has been my experience that when
using the IP filters to control traffic it does not always apply as
desired. To ensure that no problems arise, we will manually create the
reverse rule. Once again, select the "Add" button and enter the following
in the appropriate "IP Filter Wizards" dialog boxes:
- Source Address: My IP Address
- Destination Address: A Specific IP Address
- Destination IP Address: 10.0.0.0
- Protocol Type: TCP
- From This Port: 3389
Ensure that you enter these in the correct locations,
especially the "From This Port" entry. This is important because all
responses from the local host's Terminal Server application will be sent
back to the clients with a source port of 3389. Figure 4 contains the
completed IP filters for comparison.
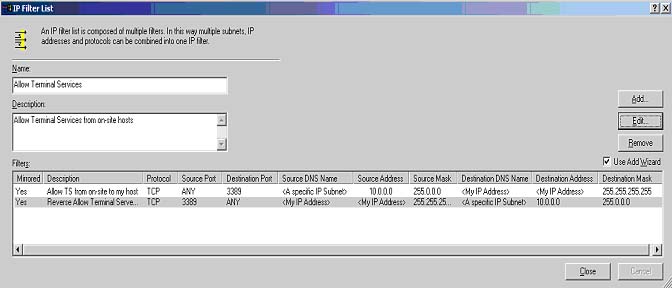
Fig 4: Completed Allow Terminal Services filters
We now need to define the filter that will block
Terminal Services from unintended hosts. Following the steps outlined
above, create a new IP Filter List named "Deny Terminal Services" with the
following filter. Figure 5 contains this new IP Filter.
- Source Address: Any IP Address
- Destination Address: My IP Address
- Protocol Type: TCP
- To This Port: 3389
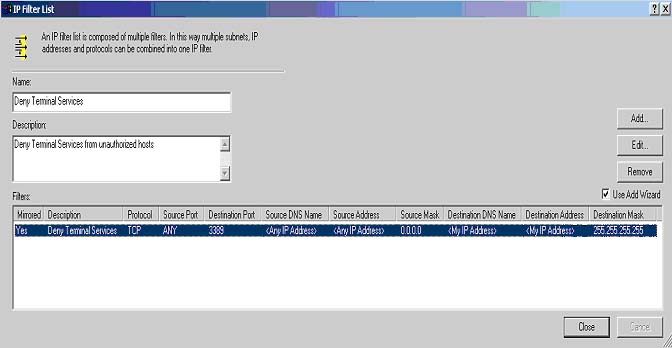
Fig 5: Completed Deny Terminal Services filter
Before we proceed, you may notice that these filters
overlap in their definition. The IP Security policies do not have a
user-defined ordering for defined filters. Instead, the filters are
evaluated from the most granular to the least specific. Since we created
an "Allow Terminal Services" filter that specifies both a source subnet
AND an explicit destination, it will be evaluated before the more general
filter of any source address to an explicit IP address. Typically, the
filters are evaluated in the following orders:
- My IP Address
- Specific IP Address defined
- Specific IP Subnet
- Any IP Address
Consequently, the protocols and services are also
evaluated in a similar fashion:
- Specific Protocol/Port combination
- Specific Protocol/Any Port
- Any Protocol
At this point, all we need to do is put it all together
in an IP Security policy. In order to do so, implement the following
steps:
- Go back to the Group Policy window and right-click in
the policies window pane and select "Create IP Security Policy".
- Click next through the IP Security Policy Wizard and
assign a name and a description to this new policy and click "Next".
- You should be prompted to use the default response
rule. Since this policy will only be inspecting packets destined for
Terminal Services and will not be providing authentication or
encryption, uncheck the default response rule box and click "Next".
- Ensure that the "Edit Properties" box is checked and
click the "Finish" button.
- At this point, you should be presented with a
properties window for this new IP Security policy in which you can now
add the filters you created previously. To make it easier to follow the
first time through, ensure that the "Use Wizard" box is checked and
click the "Add" button.
- The first decision you need to make is if this filter
policy will use a tunnel. Since we are not tunneling traffic but simply
allowing or denying traffic, select the "This Rule Does Not Specify a
Tunnel" radio button and click the "Next" button.
- Unlike the previous Windows NT4 TCP/IP Filters, the
Windows 2000 IP Security filters allows you to choose on what interfaces
to apply the filter. Since you only have one network card installed and
active, select the "All Network Connections" radio button. This will
also ensure that if another network connection is established in the
future, these filters will still apply.
- Next, you will be prompted for an authentication
scheme to use for this filter. Once again, since we are only allowing
and denying packets, keep the default Windows 2000 default selected and
click the "Next" button.
On the next screen, you should see the filters you
created (Fig 6). Through these next steps, we will be linking the
appropriate filter action to their associated filter.
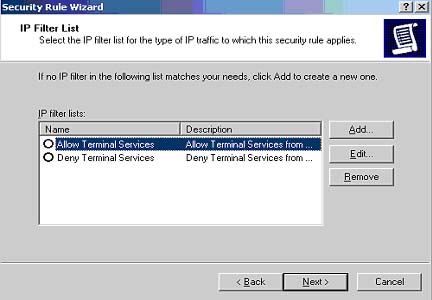
Fig 6: Defined IP Filters List
- The next screen lists the available filter actions
that can be applied to the filter selected (Fig. 7). Since we are
defining the action for the "Allow Terminal Services" filter, select the
"Permit" radio button and click the "Next" button.
- Click the "Finish" button to complete the linking of
the "Permit Filter Action" to the "Allow Terminal Services" filter.
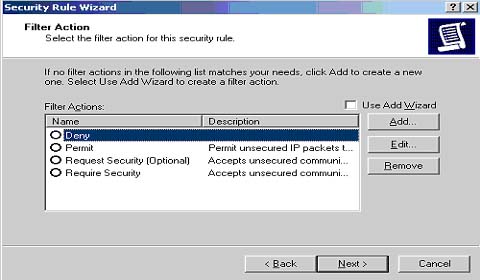
Fig 7: IP Filter Actions List
You next need to link the "DENY" filter action to the
"Deny Terminal Services" filter. Follow the same steps above and choose
the "Deny Terminal Services" radio button at the "IP Filter List" screen
and the "DENY" radio button at the Filter Action screen. Figure 8 displays
the completed IP Security Rules list.
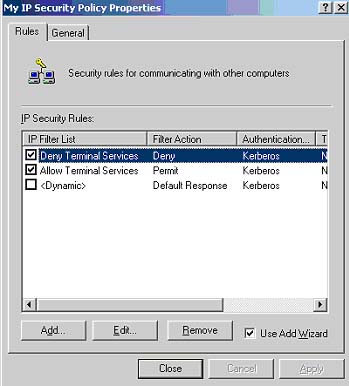
Fig 8: Completed IP Security Rules List
The checkmarks besides the filters indicate that this
rule is active. You see that the <Dynamic> filter rule is not checked.
This is the default response rule that was unchecked during the initial
set-up of this new policy.
At this point, we are ready to activate this new IP
Security policy to our machine. Click the "Close" button and return to the
Group Policy editor screen. You should now see the new policy that you
created in the listing. Right-click on this new policy and select the
"Assign" menu item. If done properly, the folder icon next to your policy
should have a small green plus (+) sign (figure 9) and a notation under
the "Policy Assigned" column that it is applied.

Fig 9: New IP Security Policy Applied
Testing and Expanding this New Policy
This new policy, which allows Terminal Services from the
defined subnet only, is now active. All other services to and from this
host are unaffected by this policy since it was applied as a default allow
scheme in which all traffic is allowed by default, with restrictions to
certain services. A little more configuration (and some noted caveats)
will be required to change this into a default deny scheme, with only
defined services and defined hosts/subnets allowed to communicate to this
host. To change to a default deny scheme, some planning must first be
performed to ensure that you don't accidentally deny a service on the
local host.
- Identify all protocols and ports used by the
listening services on your host that you wish to permit access to;
- Define the hosts/subnets you wish to connect to this
service; and,
- Work within the caveats of the IP Security Filters.
After you create the filters for your services, create
one more filter with the following parameters to deny all traffic that is
not previously allowed.
- Source: Any
- Destination: My IP Address
- Protocol: Any
- Filter Action: DENY
Since this filter is the least descriptive of any filter
in the list, it will only be applied if the traffic does not match any
other defined filter.
So, What Are the Caveats?
Since the IP Security Filters are simply packet filters,
they do not keep track of the connections and do not automatically allow
the reverse connections. For example, if you define a filter that allows
HTTP traffic from your local subnet(s) to your host, but you also wish to
allow this machine to browse Web sites outside of your local subnet, care
must be taken in building the rules to ensure that the source and
destination ports are defined correctly for each instance. This is why it
is often easier to create individual filters for each instance you wish to
allow for. In this case, create one filter that has a specific subnet
defined as the source, "My IP Address" as the destination and TCP/80 as
the destination Protocol/Port (don't forget to create the reverse of this
rule also). Then create a second filter with the source as "My IP Address"
as the source, "Any" as the destination and TCP/80 as the destination
Protocol/Port.
Don't neglect your friend, ICMP. Since ICMP is widely
used to test if a machine is reachable, among other notifications, take
care when defining your filters to include ICMP support. Since the IP
Security filters lump all ICMP type codes together, you cannot create
rules that only allow ICMP echo/echo-reply requests. For example, you
cannot create a filter that allows PING from the local subnet to your
host, and allow PING from your local host to the Internet. By attempting
to create such a rule, you would be allowing ICMP communications from both
the local subnet and the Internet. One solution to this would be to define
a filter that will "PERMIT" ICMP from a specific subnet and a second
filter that will "BLOCK" ICMP from "Any". Such a rule would not allow
hosts on the Internet to PING your host, but you would not PING them
either!
The "BLOCK" filter action does not produce any Windows
Event messages, so you will not be able to log the denied attempts. It is
suggested that users test out the IP Security filters on non-production
machines before applying to a production host to ensure that they operate
in the expected fashion. To test the filters, simply try your defined
connection attempts to your defined services from both the allowed subnets
and the places where connections should be denied. If something is not
working correctly, simply double-click on the security policy in the Group
Policy editor and uncheck the box next to the rule in question. This
action of checking and unchecking rules is applied immediately, so there
is no need to exit and re-apply the IP Security Policy. If you wish to
disable the IP Security policy altogether, simply right-click on the
policy in the Group Policy editor and select the "Un-Assign" menu item.
The policy will be removed, and full access to the host will be resumed
without any restrictions. |


