|
Understanding Debts
In Parallels H-Sphere terms a user runs into debt when their
account negative balance exceeds credit limit.
Managing Debtors
Punitive Measures
When users run into debts, they are automatically blocked from buying more resources.
Except for this, the functionality of the debtor's account isn't affected.
If you find this insufficient, use billing balance report
to track down debtors and warn them
with mass mail
of expected punitive measures if they fail to pay off the debt.
When the period to pay off the debts expires, you can
suspend their account.
This will close access to their control panel
and display a Suspended page to their site visitors.
If the debt is paid by check, you
credit the paid amount and
resume the account.
If the debt is paid by credit card, the account will be resumed automatically.
If the debtor fails to pay the debt, you can
delete their account along with
user's home directory content.
Punitive Measures Automation
Starting from 2.3.1 Beta 4 you can configure Parallels H-Sphere to apply punitive measures
to debtors automatically:
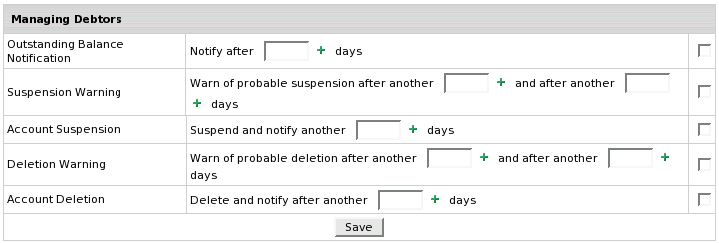
- Select Managing Debtors in the Settings menu.
- You'll be taken to the Managing Debtors form:

- Check the boxes next to the measures you'd like to apply to debtors.
- Enter the number of days to pass since the last measure taken before the enabled option is applied.
The notifications and warnings are sent to the customer's e-mail when
a cron runs accounting for the user.
* Notes: leave the days box empty, to apply enabled measure
immediately without any prolongation periods.
- Edit debtors warnings and notifications.
- Click the Save button at the bottom of the form.
Start Date of Time in Debt
If you want to change the date since when the system starts treating user as a debtor
to apply punitive measures to:
- Find this user.
- Click the username link on the search result page.
- In the Outstanding balance date field enter the new date.
- Click the Set button.
|